This 45-minute Blueberry Cookies recipe uses only 6 main ingredients and is naturally egg-free, nut-free, and incredibly easy to adapt to a gluten-free diet.
Have you ever bitten into something that completely alters your definition of what a cookie can be? When I first tested this recipe, I went in with standard cookie expectations, but what I pulled out of the oven was nothing short of miraculous. At first, my dough was too warm and slightly temperamental, but after I implemented a quick chill in the refrigerator, it baked up into the most phenomenal texture. The entire kitchen filled with the wafting, intoxicating aroma of warm berries melting into a sweet, buttery dough. It should smell intensely fragrant and almost pie-like before you take it off the baking sheet! These deeply hued, vibrantly purple, and incredibly soft treats are an absolute game-changer. Whether you are hunting for the perfect spring cookies or simply want to bake something uniquely stunning for a weekend treat, you have found your new obsession.
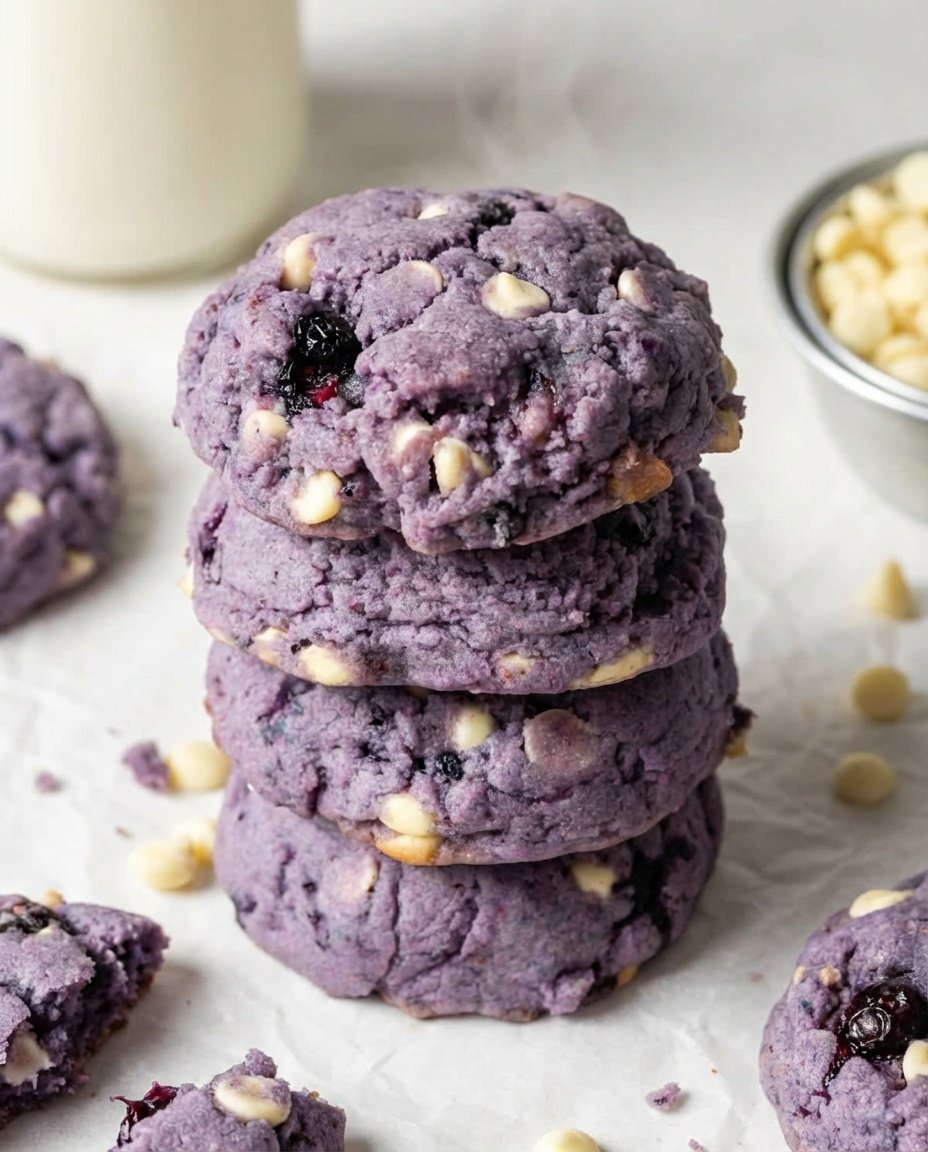
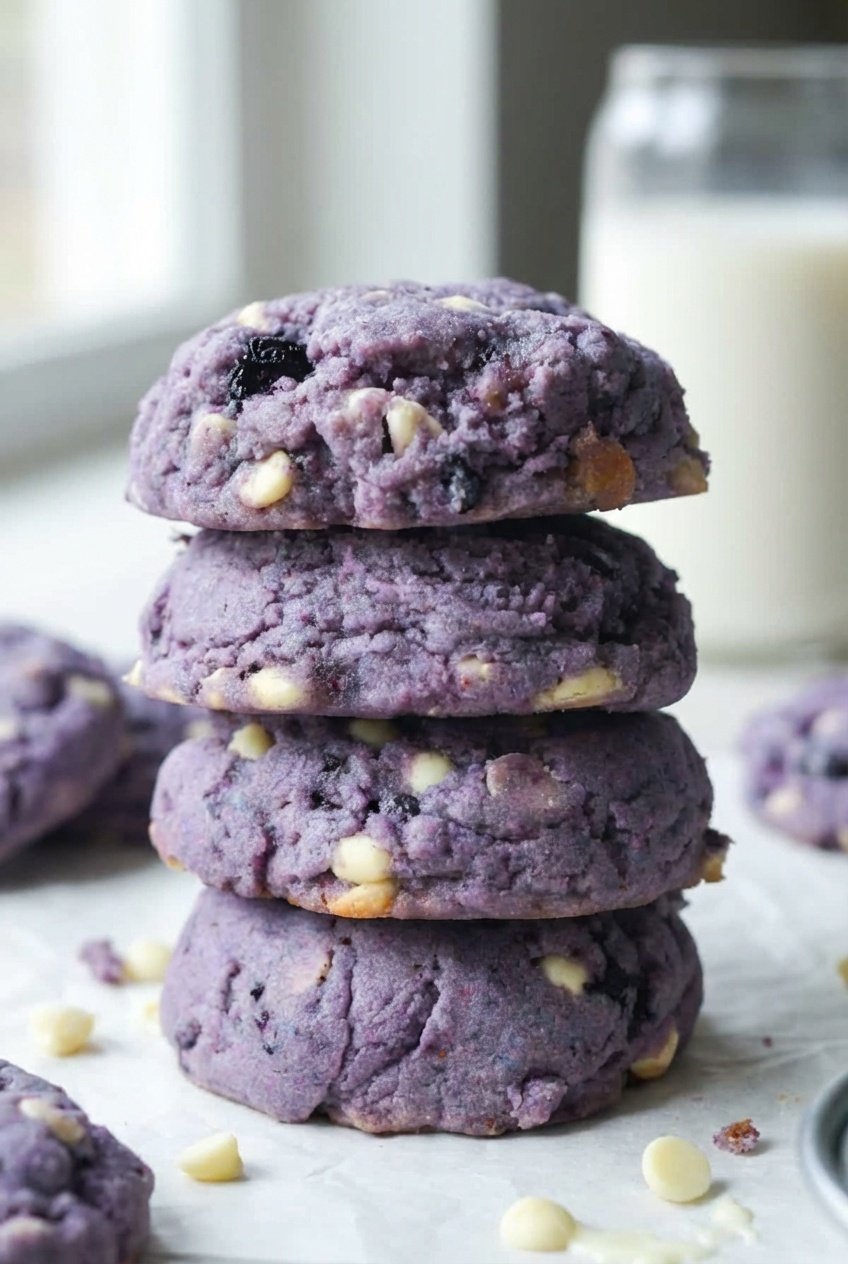
As an avid baker, I have tested countless Best Cookie Recipes, but this one stands out. Visually, these cookies are a showstopper. They boast a rich, deep violet-indigo hue completely naturally—without a single drop of artificial food coloring. When you break one in half, the tender, muffin-like crumb gives way to gooey pockets of sweet, melted white chocolate.
If you usually hunt through countless White Chocolate Chip Cookies Recipes looking for something unique, your search ends right here. Let’s dive deep into creating what will soon be a legendary staple in your household.
What is this recipe?
At its core, this magical creation is a vibrant fusion between a fluffy, artisan muffin top and a dense, chewy sugar cookie. Making Blueberry Cookies With Frozen Blueberries rather than fresh ones is the culinary key here. Frozen blueberries release just the right amount of concentrated, jammy juice when slightly warmed, completely transforming the dough into a stunning purple masterpiece. If you prefer old fashioned soft cookies with blueberries over extremely thin Crunchy Cookies, this is precisely the texture profile you will achieve.
Because the moisture from the frozen berries reacts beautifully with the flour and cold butter, there is absolutely no need for eggs in this recipe. This makes the dough perfectly safe to taste before baking (a definite win for those who love picking at stray Cookie Crumbs in the bowl!) and incredibly accessible for those with egg allergies.
These aren't your typical chocolate chip cookies. While classic White Chocolate Cookies bring a lovely, sugary profile, introducing tart and jammy blueberries completely balances the flavor. This recipe is an ideal candidate for Easter dessert tables, Mother's Day, Fourth of July, and any picturesque Brunch Spread you decide to host. And if you're looking for stunning visuals to create a vibrant blueberry recipes collage for your social media or food journal, nothing pops on camera quite like these vividly colored beauties! For quick reference later, you can find the printable blueberry dessert recipe card at the bottom of this article.
Ingredients Needed
Gathering your Cookies Ingredients has never been simpler. One of the best parts about these homemade Blueberry Cookies is that they require just a handful of standard pantry staples alongside your fruit.
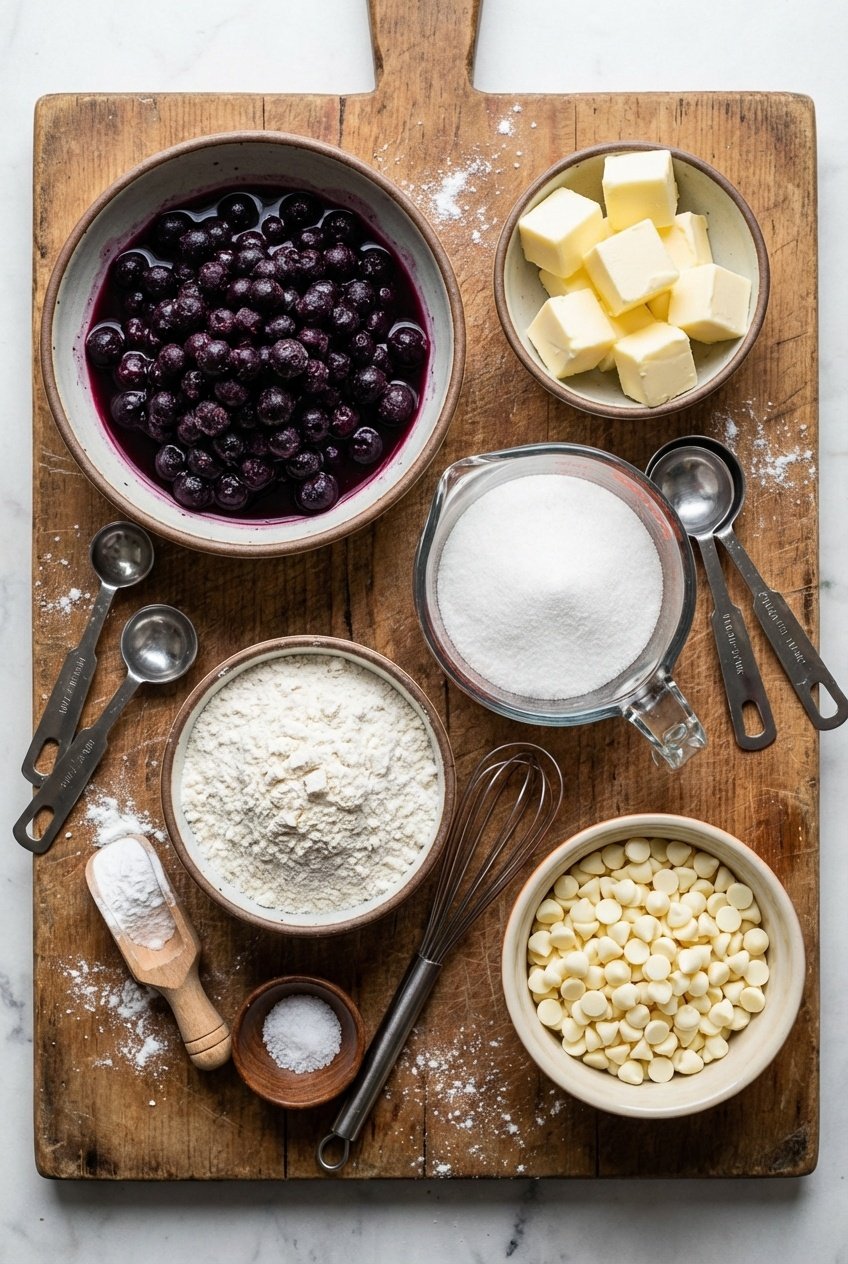
- Frozen Blueberries (⅔ cup): This is the star of the show! You absolutely must use frozen berries, not fresh. When frozen berries are gently thawed in the microwave, their cell walls break down slightly, creating a rich, intensely colored, syrupy liquid that naturally dyes the dough that gorgeous purple color and infuses every bite with flavor.
- Cold Unsalted Butter (⅔ cup): Unlike traditional cookie recipes that call for room-temperature, softened butter, this recipe demands cold butter sliced into small cubes straight from the fridge. Why? The friction of the mixer will break the cold butter down, distributing small fat pockets throughout the dough. As the cookies bake, these cold pockets create structure, preventing the cookies from melting down into thin puddles.
- Granulated Sugar (¾ cup): Simple, pure, white granulated sugar provides the clean sweetness needed to contrast the tartness of the blueberries. Avoid using brown sugar or coconut sugar here; while delicious, they contain molasses which will completely alter and muddy the beautiful, bright violet hue of your cookie dough, turning it a grayish-brown.
- All-Purpose Flour or Gluten-Free 1-to-1 Flour (2 cups): Flour gives these cookies their structure and thick, soft bite. A standard all-purpose flour works wonderfully. If you are baking for dietary restrictions, a high-quality gluten-free 1-to-1 baking blend containing xanthan gum works as a flawless substitute without compromising the texture.
- Baking Powder (1 teaspoon): Because we have the natural acidity from the blueberries, baking powder steps in as the perfect leavening agent to give these cookies a necessary, fluffy lift, mirroring the lift seen in a standard blueberry biscuits recipe card.
- Sea Salt (A Pinch): A crucial flavor enhancer! Salt heightens the blueberry notes and cuts through the intense sweetness of the white chocolate. Don't skip it!
- White Chocolate Chips (¾ cup): The ultimate companion for berries. Blueberry White Chocolate Chip Cookies have an enchanting flavor balance—the rich, creamy vanilla notes of the white chocolate fold beautifully into the vibrant, fruity dough.
Step-by-Step Instructions

The process of bringing these Blueberry Cookies to life is surprisingly quick, but following each step precisely ensures you get those thick, bakery-style results.
- Thaw the Berries: First, place the frozen blueberries in a small, microwave-safe bowl. Microwave them for about 30 seconds or until they are just thawed. They should look slightly jammy and sitting in a pool of their own deep purple juice. Crucial Rule: Do not drain this juice! That liquid is essential for hydrating the flour and giving the dough its magnificent color. Set the bowl aside to cool slightly.
- Cream the Cold Butter and Sugar: In the bowl of a stand mixer fitted with the paddle attachment (or a large Pyrex mixing bowl using a strong hand mixer), add your cold, cubed unsalted butter and granulated sugar. Turn the mixer to medium-high and beat them together for roughly 2 full minutes. Because the butter is cold, it will take a little effort to come together into a crumbly, sandy, yet cohesive mixture. It should smell sweet and buttery.
- Incorporate the Blueberry Magic: Reduce the mixer speed to low to avoid splashing. Pour in the entire bowl of thawed blueberries, ensuring every last drop of that precious purple juice goes into the bowl. Turn the speed up slightly and beat to combine. As the paddle works, it will purée most of the berries and dye the butter-sugar mixture a stunning magenta. Don't worry if a few small blueberry pieces remain intact—that just adds gorgeous texture!
- Add the Dry Ingredients: Turn off the mixer. Pour in the flour, baking powder, and the pinch of sea salt. Turn the mixer back on to its lowest setting and mix until the dry ingredients are just combined with the wet ingredients. Over-mixing at this stage activates the gluten in the flour, which can lead to dense, tough cookies instead of soft, tender ones.
- Fold in the Chocolate: Remove the bowl from the mixer and switch to a sturdy rubber spatula. Gently fold in the white chocolate chips by hand. You'll notice the dough is quite wet and slightly sticky due to the berry juices—this is perfectly normal!
- Chill the Dough (Non-Negotiable!): Place your mixing bowl directly into the refrigerator and chill the dough for exactly 20 minutes. While it chills, preheat your oven to 350°F (175°C) and line a heavy-duty baking sheet with high-quality parchment paper or a silicone baking mat.
- Scoop and Flatten: Once chilled, remove the dough from the fridge. It should now be significantly firmer and easier to handle. Use a spring-loaded cookie scoop (about 2 tablespoons in size) to portion out the dough. Drop the balls of dough onto the prepared baking sheet, leaving about two inches of space between them. Using the palm of your hand or the back of a spoon, push down slightly on each dough ball to flatten it into a thick disc. Note: These cookies do not spread much at all during baking, so the shape you create now will be the shape they retain!
- Bake to Perfection: Place the pan in the center rack of your preheated oven. Bake for 10 to 12 minutes. You are looking for the cookies to appear set around the edges and slightly matte in the middle. Do not overbake! They should feel very soft to the touch when gently pressed. They will continue to set as they cool.
- Cooling Down: Remove the baking sheet from the oven. Allow the Blueberry Cookies to cool on the hot pan for a full 10 minutes. This is called carryover cooking, and it gently finishes baking the centers without browning the bottoms. Carefully transfer them to a wire cooling rack to cool completely.
5 pro Tips for Making this recipe
To ensure your batch of Homemade Cookies turns out like a professional bakery offering, keep these five essential, heavily tested pro tips in mind:
- Temperature Control is Everything: Using cold, cubed butter and strictly chilling the dough are the two most critical steps in this recipe. When I first tested this, I was impatient and skipped the 20-minute chill. The result? Flat, thin discs instead of thick, pillowy cookies. The cold fat guarantees thickness, while chilling the dough allows the flour time to absorb the blueberry liquids fully.
- Never Drain the Berries: The natural juice from the microwaved frozen berries is entirely responsible for hydrating this egg-free dough. If you drain the liquid, your dough will be hopelessly dry, crumbly, and pale. Embrace the purple syrup—it is liquid gold for flavor and aesthetics!
- Measure Flour Accurately: Flour measuring is where many recipes go awry. If you do not have a digital kitchen scale, always use the "spoon and level" method. Use a spoon to fluff the flour in your canister, lightly spoon it into your measuring cup until mounding over the top, and then level it off gently with the flat back of a butter knife. Scooping directly with the measuring cup packs the flour down tightly, adding up to 25% extra flour to the dough, which leads to dry, cakey cookies.
- Watch the Oven Closely—Do Not Over-bake: These are intended to be soft, luscious, and slightly gooey in the center. If you leave them in the oven until they look fully hard, they will be over-baked and dry once they cool down. Pull them out at the 10 to 12-minute mark when the edges are just set but the centers still look slightly underdone and fragile.
- Utilize the Carryover Baking Process: The 10 minutes of resting time on the hot baking sheet once pulled from the oven is a vital step of the baking process. Do not try to move them immediately to a wire rack! Because we pulled them out while they were delightfully soft, they need the residual heat from the baking sheet to firm up their undersides just enough so they don't break when transferred.
How to Add More Ingredients
One of my favorite things about baking is customizing the dough. There are so many delightful ways to amplify the flavors of this Blueberry Cookies recipe. Because the base dough is highly adaptable, you can safely experiment to cater to whatever cravings hit!
- Make it Lemon-Blueberry: Blueberries and lemon are a classic, springtime pairing. Add the zest of one large, fresh lemon and one tablespoon of fresh lemon juice to the butter and sugar mixture in step two. The bright, zesty citrus oils will cut through the sweet white chocolate beautifully.
- Add Toasted Nuts: If you want these to fall slightly more into the category of Crunchy Cookies, try folding in ½ cup of finely chopped, toasted pecans, toasted almonds, or walnuts along with your white chocolate chips. The buttery crunch of the nuts provides a marvelous textural contrast against the soft, jammy berry pockets.
- Oatmeal Blueberry Blend: For an earthier, homestyle feel, you can remove ¼ cup of the flour and substitute it with ½ cup of old-fashioned rolled oats. This will give the cookie a heartier, breakfast-cookie chew that pairs flawlessly with your morning coffee.
- The Muffin-Top Streusel: Do you love the crumble on top of a bakery muffin? Before baking your chilled dough discs, lightly press a simple streusel (made from equal parts flour, sugar, and cold butter pinched together) onto the tops. It bakes up into a sweet, crumbly crust that is irresistible.
- Swap the Chips: Not a fan of White Chocolate Chip Cookies? Simply replace the white chocolate with rich dark chocolate chunks or even sweet ruby chocolate chips for a tart, berry-on-berry flavor explosion!
How to Make a Big Batch
Whether you are packing up Holiday Treats for neighbors or preparing a massive Brunch Spread for a family gathering, doubling or tripling this recipe is simple and highly effective.
To make a large batch, you will need to utilize a heavy-duty stand mixer (like a KitchenAid). Hand mixers often struggle to incorporate cold butter into doubled quantities of sugar and flour without burning out their motors. Simply double all of the ingredients mathematically. You can use an entire standard bag of frozen blueberries (just make sure you measure out 1 and ⅓ cups first before thawing!).
When chilling a double batch of dough, you may need to extend the refrigeration time from 20 minutes to 30 or 35 minutes to ensure the larger mass of dough becomes fully cold in the center of the bowl.
When baking multiple sheets at once, position your oven racks in the upper third and lower third of the oven. Bake two trays simultaneously, but crucially, set a timer for the halfway point (about 5-6 minutes). At this point, quickly open the oven, swap the top tray to the bottom and the bottom tray to the top, and spin them 180 degrees. This ensures even baking and prevents the cookies on the bottom rack from burning their undersides!
Storage Tips
Treating your finished pastries with care ensures they stay fresh, soft, and completely delectable for days!
Room Temperature: Place the completely cooled cookies in an airtight plastic or glass container. If you are stacking them, place a sheet of wax paper or parchment paper between the layers to prevent the gooey blueberries from sticking to one another. They will keep perfectly fresh at room temperature on your kitchen counter for up to 4 days. Because of the high fruit content, they retain their moisture exceptionally well!
Freezing Baked Cookies: If you want to save your Blueberry Cookies for future Holiday Treats, they freeze beautifully. Allow them to cool 100% on a wire rack. Then, place them in a single layer inside a heavy-duty ziplock freezer bag. Squeeze out as much air as possible. They can be frozen for up to one month. To thaw, simply set them on a plate at room temperature for an hour.
Reheating Tips
There is nothing quite like a Blueberry Cookie served warm, where the edges crisp slightly and the white chocolate returns to a molten, creamy state.
To recreate that fresh-out-of-the-oven magic, take a room-temperature (or fully thawed) cookie and place it on a microwave-safe plate. Microwave it on medium power for roughly 8 to 10 seconds. You want it just warm to the touch, not piping hot, as overheating will
The Best Soft & Chewy Blueberry Cookies
Ingredients
Cookie Dough
- 2/3 cup frozen blueberries do not use fresh berries; thawed with juices reserved
- 2/3 cup unsalted butter cold and sliced into cubes
- 3/4 cup granulated sugar
- 2 cups all-purpose flour or use gluten-free 1-to-1 baking flour
- 1 tsp baking powder
- 1 pinch sea salt
- 3/4 cup white chocolate chips
Instructions
- Microwave the frozen blueberries for about 30 seconds until fully thawed and jammy. Set them aside without draining any of the natural juices.
- Beat the cold, cubed unsalted butter and granulated sugar together in the bowl of a stand mixer on high speed for about 2 minutes, until smooth and well combined.
- Mix the thawed blueberries and all of their liquid juices into the butter mixture. Beat until incorporated, allowing the blueberries to naturally puree and dye the dough.
- Stir the all-purpose flour, baking powder, and sea salt into the wet ingredients until a soft, slightly sticky dough forms.
- Fold in the white chocolate chips gently to distribute them evenly. Place the mixing bowl in the refrigerator to chill the dough for 20 minutes.
- Preheat your oven to 350 degrees Fahrenheit and line a large baking sheet with parchment paper while the dough finishes chilling.
- Scoop the chilled cookie dough onto the prepared baking sheet using a cookie scoop. Gently press down on each dough ball to flatten it slightly, as these cookies do not spread much in the oven.
- Bake for 10 to 12 minutes, or until the cookie edges are firm and the centers are just set. Do not overbake to ensure they stay soft.
- Remove the baked cookies from the oven and let them rest on the baking sheet for 10 minutes before carefully transferring them to a wire rack to cool completely.
Equipment
- Stand Mixer
- Cookie Scoop
- Baking Sheet
- Parchment paper