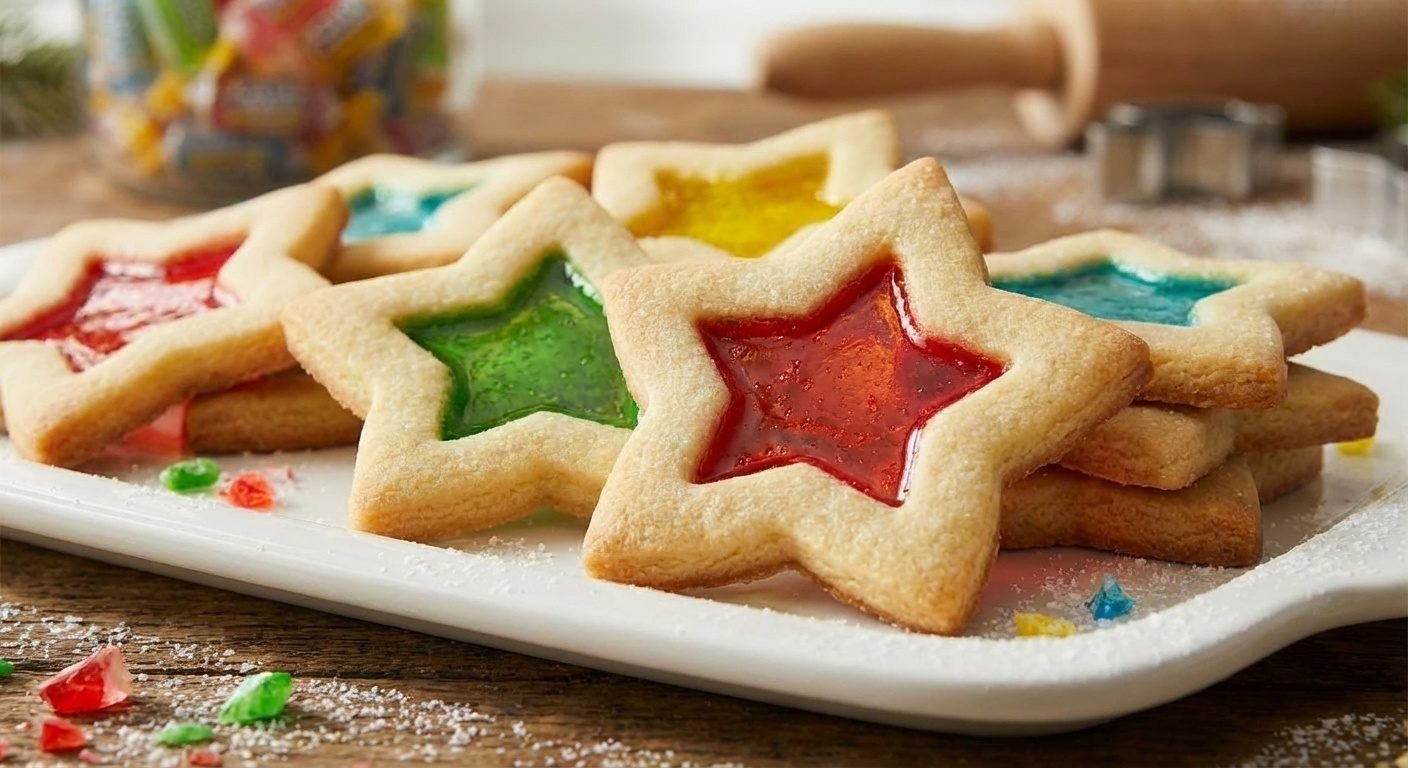
Prepare to bake the most enchanting treat of the holiday season! These Stained Glass Cookies aren't just a dessert; they're a magical experience. With buttery, crisp cookie frames and jewel-toned, translucent candy centers, they look like tiny edible windows catching the winter light. And the best part? They are surprisingly simple to create using our foolproof, no-spread sugar cookie recipe and your favorite hard candies.
Forget complicated icing and piping bags. This is one of the best Cute Christmas Snack Ideas that delivers a show-stopping result with minimal fuss. Whether you're making them for a party, a cookie exchange, or a fun family activity, these cookies are guaranteed to dazzle.
Why You'll Love This Recipe

- Absolutely Breathtaking: The vibrant, glassy centers are visually stunning and require no extra decoration.
- Deceptively Easy: If you can make cut-out cookies, you can make these! It's a fantastic Easy Sweet Recipe for bakers of all skill levels.
- Perfect for the Holidays: These cookies double as beautiful, edible ornaments for your Christmas tree. They're the ultimate DIY Christmas Sweets project.
- Deliciously Unique: The combination of a classic buttery sugar cookie with the fruity crunch of a Jolly Rancher is simply irresistible.
Ingredients Needed
This recipe uses simple, staple ingredients for both the cookie dough and the sparkling glass centers.
For the No-Spread Sugar Cookie Base
- Butter: ¾ cup, softened to room temperature for a smooth, creamy dough.
- Granulated Sugar: 1 cup, for the perfect amount of sweetness.
- Large Egg: 1, to bind the dough together.
- Vanilla Extract: 1 Tablespoon, for that classic, warm cookie flavor.
- All-Purpose Flour: 2 ½ cups, providing the structure.
- Salt: ½ teaspoon, to balance the sweetness.
For the "Stained Glass" Centers
- Jolly Ranchers: About 16 hard candies. Feel free to use any semi-translucent hard candy like Life Savers or other fruit drops.
Essential Equipment
- Electric Mixer: A hand mixer or stand mixer will make creaming the butter and sugar effortless.
- Cookie Cutters: You'll need at least one large shape and a smaller one that fits inside it. Stars, circles, or ornament shapes work beautifully.
- Hammer or Meat Mallet: For crushing the hard candies.
- Parchment Paper or Silicone Mat: This is crucial! It prevents the melted candy from sticking permanently to your baking sheets.
Step-by-Step Instructions
Follow these simple steps to create your own gorgeous Jolly Rancher Cookies.
Step 1: Prepare the Cookie Dough
- Cream the Wet Ingredients: In a large mixing bowl, beat the softened butter, sugar, salt, egg, and vanilla extract with an electric mixer until the mixture is light and fluffy.
- Add the Flour: Gradually add the all-purpose flour to the wet ingredients, mixing on low speed until the dough just starts to clump and pull away from the sides of the bowl.
- Knead and Chill: Turn the dough out onto a clean surface and knead it a few times to form a smooth ball. Wrap it tightly in plastic wrap and chill in the refrigerator for at least 1 hour. This step is essential to prevent the cookies from spreading.
Step 2: Create the Candy "Glass"
- Sort and Crush: While the dough chills, unwrap your Jolly Ranchers and sort them by color. Place the candies of one color into a sealed plastic bag.
- Smash: Place the bag on a sturdy surface and use a hammer or meat mallet to crush the candies into very small pieces, almost like coarse glitter. Avoid large chunks, as they won't melt as evenly. Repeat for each color.
Step 3: Roll, Cut, and Assemble
- Roll Out the Dough: Lightly flour your work surface and rolling pin. Roll the chilled dough to a thickness of just over ¼ inch.
- Cut the Shapes: Use your larger cookie cutter to cut out your primary shapes. Place them on a parchment-lined baking sheet, leaving some space between each one.
- Create the Windows: Use your smaller cookie cutter to cut out the center of each cookie. Remove the small center piece of dough (you can re-roll these scraps!).
- Fill with Candy: Carefully spoon the crushed candy into the center cut-outs of each cookie. Fill the space completely but try not to overfill it, and brush away any stray candy dust from the cookie dough surface.
Step 4: Bake to Perfection
- Preheat and Bake: Preheat your oven to 350°F (175°C). Bake the cookies for about 12 minutes, or until the edges are lightly golden and the candy has fully melted into a smooth, liquid pool.
- Cool Completely: This is the most important step! Let the cookies cool completely on the baking sheet for at least 20-30 minutes. The melted candy needs to harden fully before you attempt to move them. Once solid, you can transfer them to a wire rack.
Tips for Success
Here are a few professional tips on how to make glass cookies that look and taste perfect.
- Don't Skip the Chill: Chilling the dough is non-negotiable. It solidifies the butter, which prevents your carefully cut shapes from spreading into blobs in the oven.
- Parchment is Your Best Friend: Do not bake these directly on a cookie sheet. The melted sugar will harden and weld your beautiful cookies to the pan. A silicone mat also works perfectly.
- Pop the Bubbles: If you notice air bubbles in your melted candy right after pulling the cookies from the oven, you can quickly and carefully pop them with a toothpick for a flawlessly smooth finish.
- Get Creative with Shapes: While stars are classic for Christmas, try hearts for Valentine's Day or circles to create edible "ornaments." These are far more unique than standard Christmas decorating cookies. While some bakers love intricate cookies like classic
Kiffles cookies, the beauty of these is in their simplicity.
Frequently Asked Questions
Can I use other types of cookies?
This no-spread sugar cookie recipe is ideal because it holds its shape perfectly. If you have another trusted cut-out cookie recipe that doesn’t spread, feel free to use it!
How do I store Stained Glass Cookies?
Store them in a single layer in an airtight container at room temperature for up to a week. Stacking them can cause the candy centers to stick or crack, especially in humid environments.
Can I turn these into Christmas ornaments?
Absolutely! Just before baking, use a straw or skewer to poke a small hole in the top of each cookie. Once they are baked and fully cooled, thread a ribbon through the hole to create beautiful, edible decorations. They are some of the best Easy Christmas Biscuits to hang on the tree
The Best Stained Glass Cookies Recipe
Ingredients
For the Sugar Cookie Dough
- 3/4 cup butter softened to room temperature
- 1 cup granulated sugar
- 1 large egg
- 1 Tablespoon vanilla extract
- 2 1/2 cups all-purpose flour
- 1/2 teaspoon salt
For the Stained Glass Center
- 16 Jolly Rancher hard candies assorted colors
Instructions
- Cream the butter and sugar by combining the room temperature butter, granulated sugar, salt, vanilla extract, and egg in a large mixing bowl. Use a hand or stand mixer to beat the ingredients until the mixture is light and fluffy.
- Form the cookie dough by gradually adding the all-purpose flour to the wet ingredients. Mix on low speed until the dough just begins to clump together into a crumbly mixture.
- Knead and chill the dough by transferring it to a lightly floured surface and kneading briefly to form a cohesive ball. Wrap the dough tightly in plastic wrap and chill in the refrigerator for at least 1 hour.
- Prepare the candy filling while the dough chills. Unwrap the Jolly Rancher candies, sorting them by color. Place candies of the same color into a sealable plastic bag and use a hammer or meat mallet to crush them into small, pebble-like pieces.
- Preheat the oven to 350°F (175°C). On a well-floured surface, roll out the chilled cookie dough to a thickness of approximately 1/4 inch.
- Cut out the cookie shapes using a larger cookie cutter. Carefully transfer the cut-out cookies to a baking sheet lined with parchment paper, spacing them about an inch apart.
- Create the 'window' for the stained glass effect by using a smaller, similarly shaped cookie cutter to cut out the center from each cookie directly on the baking sheet.
- Fill and bake the cookies by carefully spooning the crushed Jolly Rancher pieces into the center cut-outs. Fill them completely but do not let them overflow onto the cookie dough. Bake for 12 minutes, or until the cookie edges are lightly golden and the candy is fully melted and bubbling.
- Cool the cookies completely on the baking sheet for 20-30 minutes. This step is crucial, as it allows the melted candy center to harden properly before you attempt to move the cookies.
Equipment
- Hand or Stand Mixer
- Baking Sheets
- Parchment paper
- Cookie Cutters (in at least two sizes)
- Rolling Pin
- Hammer or Meat Mallet