I found this cake, or maybe it found me, on a drizzly afternoon in Lisbon. I was lost, in the best possible way, down one of those impossibly steep alleys in Alfama when the scent of vanilla and baking sugar pulled me into a tiny pastelaria. There it sat, not in a refrigerated case, but right on the counter under a glass dome: a cake so humble and beautiful it made my heart ache. It was just layers of golden cake, barely dressed, with the seeds from a real vanilla bean speckled throughout like little promises. I ordered a slice with a bica, and as I sat at a wobbly tin table watching the trams rattle by, I had a single, clear thought: I need to be able to make this feeling at home.
My kitchen mission wasn’t about replicating a museum piece. It was about capturing that Wednesday-in-Lisbon vibe for a Tuesday in my own dining room. I wanted the rich, perfumed flavor, the tender crumb that melts on your tongue, but I refused to accept a recipe that required a PhD in pastry. After what my friends lovingly called “The Great Vanilla Experiment of 2023,” involving more than a few dense frisbees and one glorious, lopsided success, I found the balance. This version is my kitchen triumph. It’s the cake I can whip up almost without thinking when friends pop over, when a birthday sneaks up on me, or when the day just needs a little gilding. It proves that a stunning, soul-warming dessert doesn’t have to cost you your entire evening.
So, this is it: my passport cake. One bite and I’m right back on that cobblestone street. It’s effortless elegance, a quiet showstopper that leaves everyone asking for the recipe. It’s the cake that taught me the most memorable flavors aren’t just about ingredients, but about the moments they help you create, right where you are.
What is this recipe?
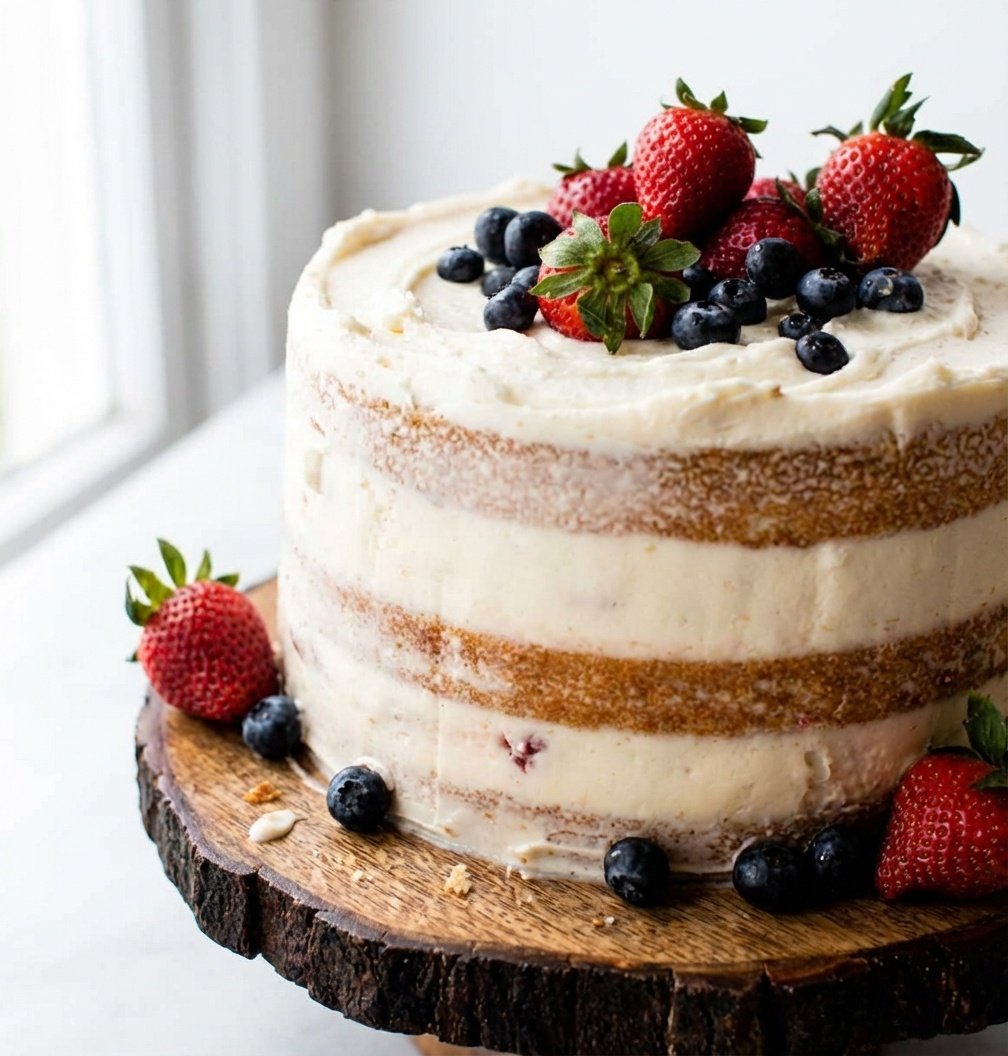
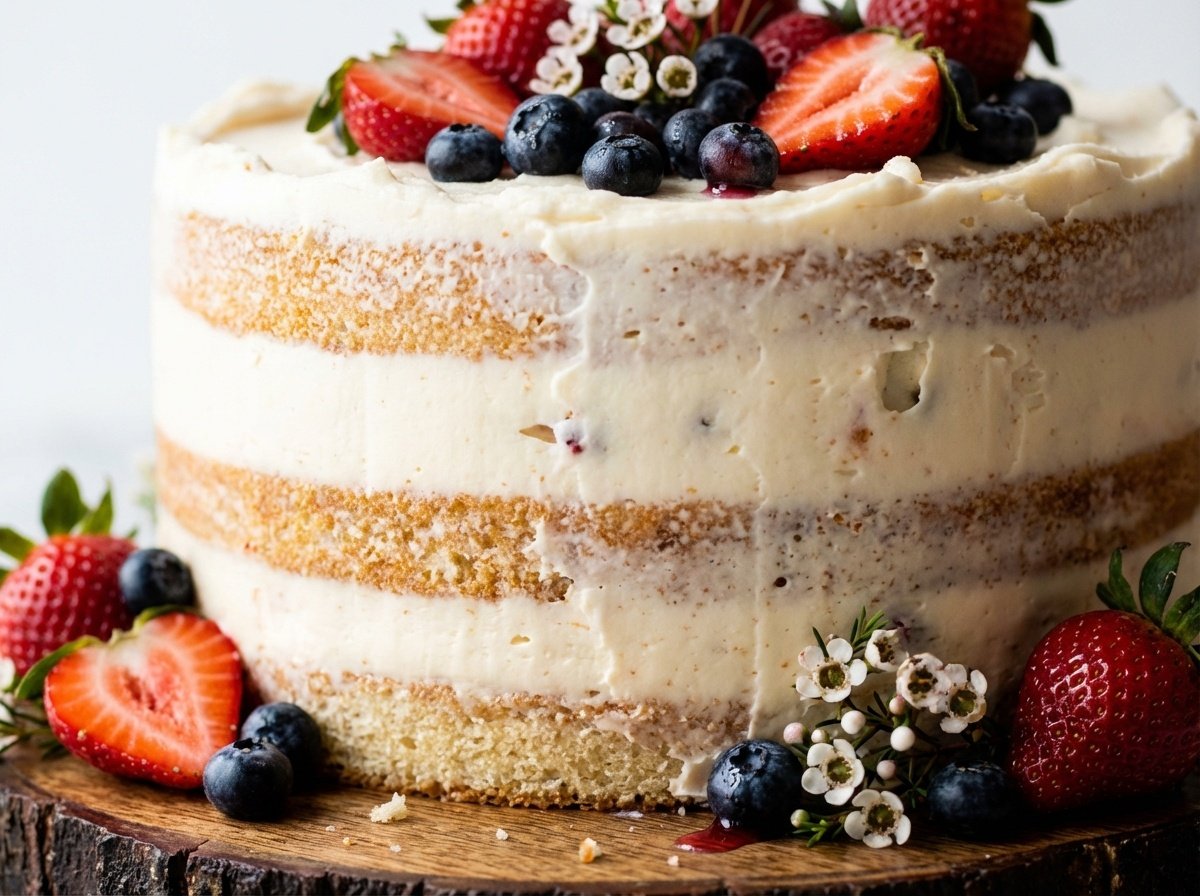
This 6-hour (mostly cooling and chilling time) Vanilla Naked Cake recipe uses fresh raspberries, rich homemade vanilla buttercream, and a meticulously crafted three-layer vanilla cake to create a stunning, rustic masterpiece perfect for your next big celebration. It exposes the edges of the cake to show off the gorgeous layers, combining an elevated visual aesthetic with undeniably delicious flavors. Whether you are leaning into some fun spring baking or looking for simple cakes wedding planners would envy, this naked cake is the answer.
When you bring this dessert to the table, everyone's jaw drops. I guarantee you will look like a professional pastry chef, yet the technique relies on an approachable, rustic style that forgives minor decorating errors. It represents the perfect harmony of rich flavors and minimalistic design, transforming standard ingredients into a show-stopping dessert.
The Magic of the Naked Cake Trend
Naked cakes, characterized by zero to minimal frosting on the outside, purposely expose the delicate baked layers and sweet filling. This breathtaking rustic-chic cake presentation has been completely taking over the culinary world. You will see it dominating the wedding circuit, baby showers, bridal showers, and sophisticated party scenes.
Famed Milk Bar owner Christina Tosi is widely credited with kickstarting this bold trend back in 2013 when she decided that covering up delicious cake layers with an inch of fondant was a tragedy. She began highlighting the varied textures of the cake and filling itself instead of just masking it with external frosting. Fast forward to today, and nude cakes are a definitive bakery staple everywhere.
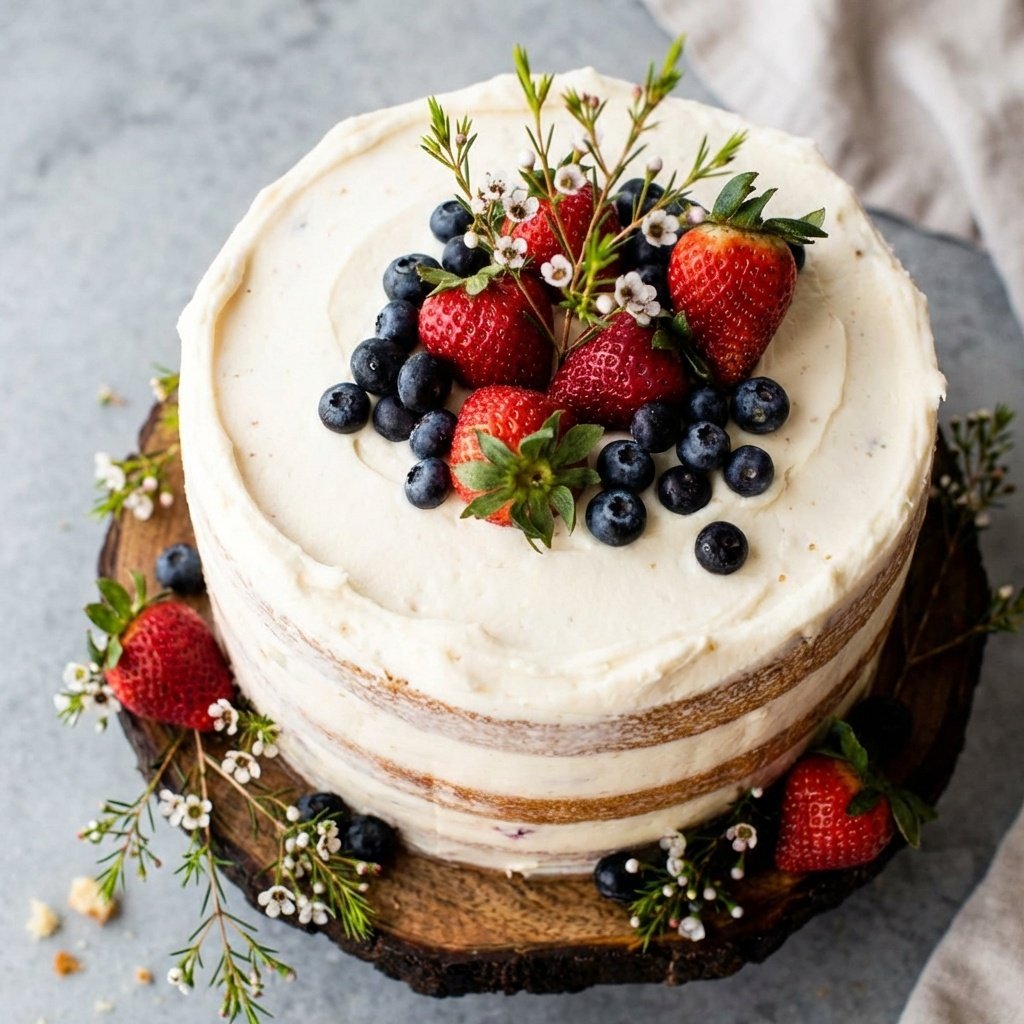
A stunning, wholesome addition to any festivity, naked cakes are absolutely perfect for Easter Sunday, Mother’s Day, intimate small weddings, or when you need a captivating naked birthday cake. What I love most deeply about this specific style is the raw creative control it hands you. You can decorate the exterior in your own completely unique, personalized way, which makes baking this recipe 100x more fun. If you are specifically interested in wedding cakes simple rustic aesthetics, this foundation is completely foolproof.
Understanding Semi-Naked vs. True Naked
When we discuss naked cakes, we are actually looking at two distinct variations. The cake we are building today is frequently referred to as a semi-naked or “half dressed” cake. This approach uses a very thin, translucent layer of frosting expertly swiped around the sides. In baker’s terms, a semi naked wedding cake rustic style is essentially a smooth, tight crumb coat left as the final finish.
Conversely, you can choose to simplify the grand design even further with a completely true naked cake. This means the exterior sides of the cake are entirely bare, showing every baked pore and crumb, while only the horizontal space between the tiers gets the buttercream treatment. Both styles are beautifully simplistic, incredibly approachable for home cooks, and wonderfully appetizing.
5 pro Tips for Making this recipe
Creating a structurally sound, visually immaculate dessert requires just a bit of forethought. When I first tested this, the frosting was tearing the cake apart because my layers were slightly too warm, resulting in a crumbly disaster. Once I discovered the magic of extreme chilling, it was a complete game-changer. Follow these crucial tips:
- Make a Solid Plan: Always visualize the specific style of cake you desperately want—whether it's an entirely bare nude cake or a slightly coated semi-naked look. Determine your final garnishes before you start mixing. Knowing if you are making a floral naked cake or utilizing heavy fruits will completely dictate exactly how much frosting you ultimately need to prepare.
- Prepare Your Cake Pans Like a Professional: Use high-quality, heavy-duty aluminum cake pans and grease them obsessively so the delicate crumb releases effortlessly. I strongly recommend relying on nonstick baking spray followed closely by a fitted parchment paper round at the bottom of the pan. For visually stunning, beautifully even layers, you must ensure each pan holds the exact same amount of batter. The most remarkably accurate way to accomplish this is to utilize a digital kitchen scale. Place your prepared pan directly on top, zero it out, and pour the batter until they all weigh the identically same amount.
- Leveling is Absolutely Mandatory: Level off the domed top of each baked cake layer so both horizontal sides are perfectly flat. This is not just for looks; this is structurally essential because flat and perfectly even layers add vital stability to your finished masterpiece. If you ignore this step, your beautiful tower will lean and slide. You can utilize an adjustable wire cake leveler or a large serrated bread knife. I always stick to my trusty serrated knife and use a gentle sawing motion at eye level.
- Master Your Room Temperature Ingredients: Using truly room-temperature ingredients is a non-negotiable science. The butter should yield to gentle pressure, feeling cool but leaving a slight indentation, rather than melting completely greasy on your fingers. This allows the butter to trap precious air during the creaming process, creating a light, fluffy, angelic crumb rather than a dense, heavy brick.
- The Refrigerator is Your Best Friend: Always properly chill your completely assembled naked cake in the refrigerator for at least two to three hours before even thinking about slicing and serving. Why? This intensely cold environment chemically stabilizes all of your hard labor! It forces the butter-based frosting to adhere powerfully to the sides of the cake, as well as ensures an incredibly sharp, perfectly neat slice when serving.
Ingredients Needed
Creating a magical, mouthwatering rustic recipe requires high-quality, fresh ingredients. Every single element brings a crucial scientific and flavorful contribution to the cake.
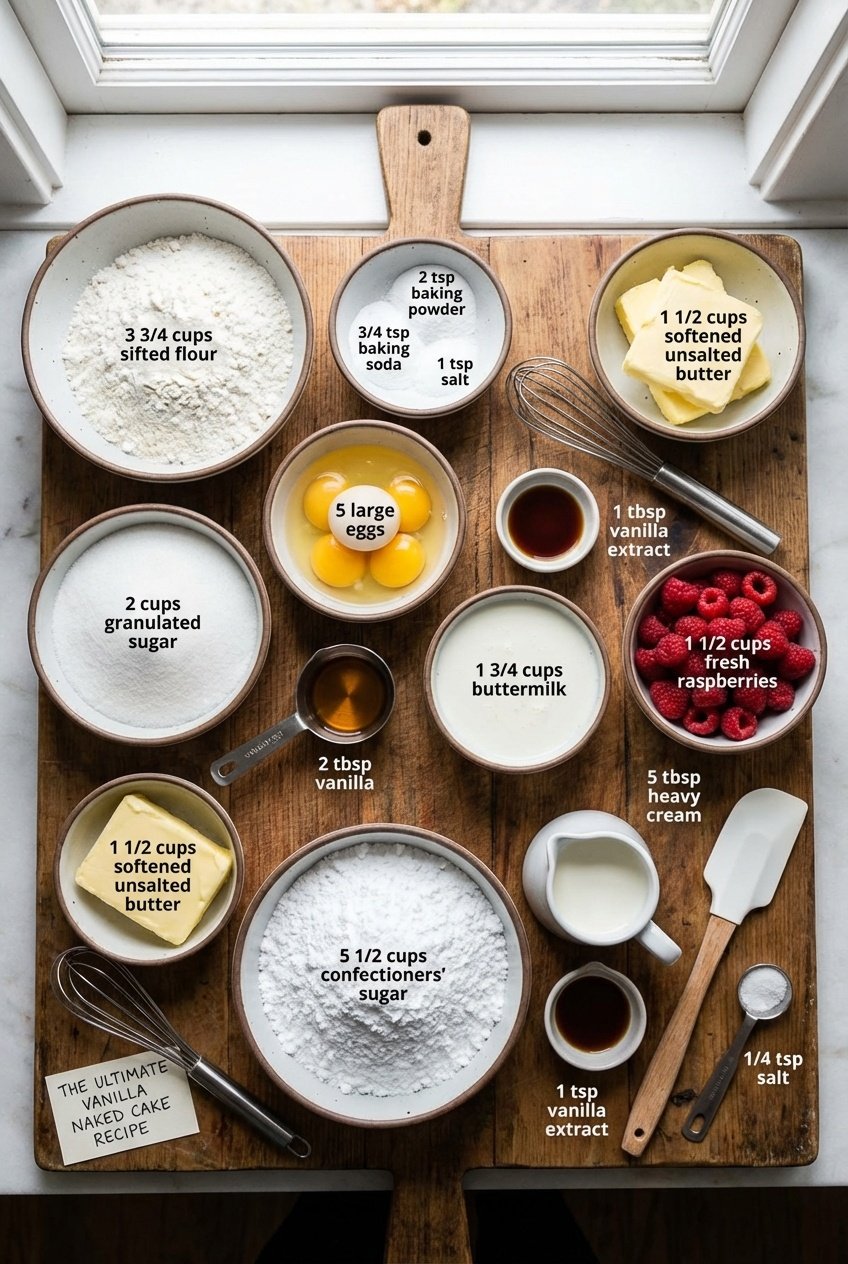
For the Vanilla Layer Cake:
- 3 and 3/4 cups (443g) all-purpose flour: Carefully sifted, then spooned and leveled. Using all-purpose flour rather than cake flour provides just enough sturdy gluten development to help this cake comfortably support multiple tiers without collapsing.
- 2 teaspoons baking powder & 3/4 teaspoon baking soda: This dual-leavening combination ensures the cake powerfully rises against the weight of the rich butter and heavy moisture from the buttermilk.
- 1 teaspoon fine sea salt: Salt is absolutely mandatory to cut the intense sweetness of the sugars and bring out the nuanced floral notes of the vanilla.
- 1 and 1/2 cups (340g) unsalted butter: Extremely softened to proper room temperature. Do not use salted butter here, as you lose control over the overall sodium content of the cake.
- 2 cups (400g) granulated sugar: Creamed thoroughly with the butter to introduce thousands of microscopic air pockets that expand delightfully in the oven heat.
- 5 large eggs: Brought fully to room temperature. Eggs supply rich fat from the yolks and critical structure from the protein-dense whites.
- 1 Tablespoon pure vanilla extract: Yes, a whole tablespoon! When executing a quintessential vanilla cake recipe with berries, you cannot skimp on the star flavor. Use real extract, never imitation.
- 1 and 3/4 cups (420ml) buttermilk: Brought to room temperature. The acidic tang of buttermilk tenderizes the tough gluten strands, guaranteeing an unbelievably moist, soft interior crumb.
- Optional: 1-2 cups of gorgeous, vibrant fresh raspberries or other summer berries for stuffing between the fluffy layers.
For the Dreamy Vanilla Buttercream:
- 1 and 1/2 cups (340g) unsalted butter: Softened precisely to room temperature for the ultimate smooth texture.
- 5 to 6 cups (600-720g) confectioners’ sugar: Carefully sifted to completely eliminate any irritating lumps that might ruin your perfectly smooth finish.
- 5 to 6 Tablespoons (75-90ml) heavy cream: This creates a sumptuously rich, airy mouthfeel that milk alone simply cannot achieve.
- 1 teaspoon pure vanilla extract: To continuously carry the vanilla profile throughout the entire dessert.
- 1/4 teaspoon fine sea salt: A pinch is essential to balance the intense rush of confectioners' sugar.
Step-by-Step Instructions
Baking is a delightful combination of art and precise chemistry. Follow these detailed steps for guaranteed success.
- Prepare for Baking: Begin by fully preheating your oven to exactly 350°F (177°C). Take three 9-inch round aluminum cake pans, generously grease them, firmly line the bottoms with precut parchment paper rounds, and lightly grease the top of the parchment paper again.
- Whisk the Dry Ingredients: In a large, wide mixing bowl, passionately whisk the all-purpose flour, baking powder, baking soda, and fine salt together until perfectly blended. Set this important foundation aside.
- Cream the Butter and Sugar: Utilizing a powerful stand mixer meticulously fitted with the paddle attachment, vigorously beat the softened butter and granulated sugar together on medium-high speed. Do this for a solid 3 full minutes. The mixture must transform from pale yellow to nearly white, and it should smell delightfully sweet and buttery. Periodically scrape down the stubborn sides and bottom of the mixing bowl with a flexible silicone spatula.
- Incorporate the Wet Ingredients: Reduce the mixer speed to medium. Very carefully add the room-temperature eggs exactly one at a time, patiently allowing each single egg to thoroughly absorb before adding the next. This prevents the delicate emulsion from suddenly breaking or curdling. Beat in the rich tablespoon of pure vanilla extract.
- Alternate Wet and Dry: With the faithful mixer running on its absolute lowest speed, introduce the pre-mixed dry ingredients in three distinct additions, creatively alternating with the poured buttermilk. You should always begin and boldly end with the dry ingredients. Mix each gentle addition just barely until it becomes visibly incorporated. Do not dare overmix this gorgeous batter, or your final texture will become rubbery. The final batter will look luxuriously smooth, beautifully velvety, and wonderfully thick.
- Distribute and Bake: Your beautiful batter should yield approximately 8 full cups. Measure precisely 2 and 2/3 cups of batter directly into each prepared cake pan, smoothing the tops completely flat with a small offset spatula. Bake bravely in the preheated oven for around 25 to 26 minutes.
- Test for Doneness: As they approach the 25-minute mark, your kitchen will fill with the incredible, mouthwatering aroma of toasted sugar and heavenly buttery cake. It should smell rich and fragrant before you ever open the oven door. Carefully insert a wooden toothpick directly into the very center of the sponge; if it emerges perfectly clean without wet batter clinging to it, the cakes are miraculously done. Allow the beautiful golden cakes to completely cool inside the pans resting on a wire rack.
- Whip the Buttercream: While the cakes stubbornly cool, thoroughly wash out your stand mixer bowl. Add the room-temperature butter and violently beat it on medium speed for 2 minutes until exceedingly creamy. Slowly drop the speed to low and cautiously add 5 and 1/2 cups of sifted confectioners’ sugar, 5 generous Tablespoons of heavy cream, the vanilla extract, and the salt. Once incorporated without creating a massive dust storm, dramatically increase the speed to high and ruthlessly beat the frosting for 3 continuous minutes. You are violently whipping glorious air into the fats, creating a heavenly cloud of frosting.
- Level and Stack: Once the glorious cakes are fully, completely, undoubtedly cold to the touch, grab your serrated knife. Gently slice a painfully thin layer entirely off the uneven tops of the cakes to aggressively flat surfaces. Discard these scraps (or secretly eat them standing over the kitchen counter).
- The Assembly Phase: Proudly place the first cake layer firmly on a spinning cake turntable or decorative serving plate. Smear 1 and 1/2 cups of the fluffy vanilla buttercream completely over the top surface. Gently nestle half of your gorgeous fresh raspberries completely around the extreme outer rim, flattening them forcefully into the thick frosting so they don't arrogantly prevent the next tier from resting flatly.
- Repeat the Build: Carefully drop the second sturdy layer directly on top. Evenly spread another luxurious 1 and 1/2 cups of frosting. Press the absolutely remaining fresh raspberries along the outer rim once more. Firmly top the towering structure with the impressive third and final cake layer.
- The Crumb Coat Execution: Generously smear the completely remaining amount of sweet frosting aggressively on the top and gingerly all around the vertical sides. Take your rigid metal bench scraper and press it parallel against the very side of the entire cake. Spin the turntable while maintaining even, steadfast pressure, mercilessly dragging the scraper around to forcibly smooth out the external frosting. You will scrape off most of the frosting on the sides, revealing the gorgeous baked crumb underneath. This is the hallmark magic of semi naked cakes.
- Final Chill: Generously adorn the top with your final decorative touches. Proceed to tightly refrigerate the entire constructed cake for 2 to 3 absolute hours before daring to slice and passionately serve it.
Reheating Tips
It might completely surprise you to encounter a reheating section for a beautifully decorated wedding cake design! While heating an intricately constructed, fully frosted tier cake will devastatingly melt your pristine buttercream and completely ruin the rustic birthday cake aesthetic, bringing individual leftover slices back to that magical "just out of the oven" temperature is highly encouraged!
Because this batter utilizes high-quality butter, chilling the cake causes those rich fats to solidly firm up in the refrigerator, temporarily changing the perceived texture to feel surprisingly dense. To revive that fresh, meltingly soft, moist crumb of the original bake, place a solitary slice of cake safely on a microwave-safe plate. Heat it furiously on high for exactly 6 to 8 brief seconds.
The heat gently kisses the interior crumb, intensely re-softening the butter to an incredibly tender, unbelievably moist state without completely turning your delicate swiped frosting into a molten puddle. Your individual slice will mysteriously taste just like you finished baking it a mere five minutes ago.
Storage Tips
This breathtaking recipe has remarkable longevity if you treat the structure with deep respect. The very nature of naked cakes—where the internal crumb is fully exposed to harsh ambient air rather than safely trapped beneath a thick wall of protective fondant—means they are inherently highly susceptible to premature drying out.
Storing Uncut Cakes: If you fully assemble and aggressively chill your stunning cake prior to your magnificent party, simply leave it completely uncovered inside your cool refrigerator for the first solid hour. This brilliantly allows the exterior frosting shell to dry and "set." Once thoroughly firmed up, expertly drape a massive sheet of loose plastic wrap directly over the entire rustic centerpiece. The plastic gently clings to the cold, stiff frosting without causing any visual damage while entirely preventing cold refrigerator air from stripping out the internal moisture. A fully frosted, beautifully constructed semi naked cake lasts incredibly well in the refrigerator for an absolute maximum of 2 days before a major party.
Storing Cut Leftovers: Once the joyous slicing commences and the internal cake layers are completely breached, heavily cover any open gashes with spare frosting if available, or gently press small sheets of cling wrap intimately against the exposed crumb faces. Leftovers survive wonderfully well at room temperature inside an airtight plastic cake dome carrier for exactly 1 to 2 days, or safely inside the chilly refrigerator for an incredible full week.
Freezing Components: Yes, you can undoubtedly freeze the separate pieces of this easy cake decorating adventure. Wrap completely un
The Ultimate Vanilla Naked Cake Recipe
Ingredients
Vanilla Cake
- 3 3/4 cups all-purpose flour sifted, spooned and leveled
- 2 tsp baking powder
- 3/4 tsp baking soda
- 1 tsp salt
- 1 1/2 cups unsalted butter softened to room temperature
- 2 cups granulated sugar
- 5 large eggs room temperature
- 1 tbsp pure vanilla extract
- 1 3/4 cups buttermilk room temperature
- 1 1/2 cups fresh raspberries optional, or substitute with preferred fresh berries
Vanilla Buttercream
- 1 1/2 cups unsalted butter softened to room temperature
- 5 1/2 cups confectioners' sugar
- 5 tbsp heavy cream
- 1 tsp pure vanilla extract
- 1/4 tsp salt
- finishing decorations fresh flowers or extra berries for garnish
Instructions
- Preheat your oven to 350°F (177°C). Prepare three 9-inch round cake pans by thoroughly greasing them, lining the bottoms with parchment paper rounds, and lightly greasing the parchment paper to guarantee an easy cake release.
- Whisk the sifted all-purpose flour, baking powder, baking soda, and salt together in a large bowl. Beat the softened butter and granulated sugar in a stand mixer on high speed for about 3 minutes until smooth and creamy. Add the eggs one at a time on medium-high speed, beating well after each, then blend in the vanilla extract.
- Blend the dry ingredients into the wet mixture on low speed in three additions, alternating with the room-temperature buttermilk. Begin and end with the dry ingredients, mixing just until incorporated to ensure a tender, fluffy cake crumb.
- Divide the vanilla cake batter evenly among the three prepared cake pans, using roughly 2 and 2/3 cups of batter per pan. Smooth the tops with a rubber spatula for even baking.
- Bake the cakes for 25 to 26 minutes, or until a toothpick inserted into the center comes out clean. Cool the cakes completely in their pans on a wire rack before you begin frosting and assembling.
- Beat the softened butter on medium speed for 2 minutes until creamy to prepare the vanilla buttercream. Gradually add the confectioners' sugar, heavy cream, vanilla extract, and salt on low speed, then whip on high speed for 3 full minutes until exceptionally fluffy.
- Level the cooled cake layers using a large serrated knife. Place the first layer on a cake stand, spread 1 and 1/2 cups of vanilla buttercream evenly, and press fresh raspberries into the frosting around the edges. Repeat this process with the second layer, then top with the final layer. Spread the remaining buttercream thinly over the top and sides, using a bench scraper to create a rustic, semi-naked cake finish.
- Refrigerate the assembled naked cake for 2 to 3 hours before slicing to stabilize the layers and set the buttercream. Garnish with additional fresh berries or food-safe flowers just before serving.
Equipment
- 9-inch Round Cake Pans
- Electric Stand Mixer
- Bench Scraper
- Icing Spatula