I found my food soulmate in a Denver pub booth, and it wasn’t a person—it was a plate of cheese croquettes. Back when The Cheeky Monk was my second home, I’d wedge myself into that corner spot, order a beer, and wait for that first bite of golden, crispy perfection. The crunch, the molten cheese flood, that tangy berry sauce… it was pure, unadulterated joy. When they closed, it felt like a personal loss. My kitchen became my mission control, and I was determined to reverse-engineer that happiness.
Let’s just say my first attempts were… educational. A salty disaster here, a breadcrumb rebellion there. I learned the hard way that using regular butter was the culprit behind the salt assault, so I switched entirely to unsalted to take back control. It was a process of patient tweaking, of getting the chill just right and mastering the double-dip breading technique that makes all the difference.

Now, these croquettes are my secret weapon. They turn a dreary Tuesday into a celebration and make any gathering feel special. That satisfying *crack* when you bite in, followed by the ooze of velvety cheese, is a little piece of travel nostalgia right on my plate. It’s proof that the best food memories aren’t just for remembering—they’re for recreating, one perfectly fried bite at a time.
What is this recipe?
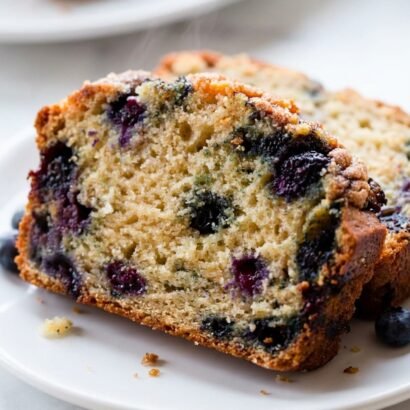
At their core, Croquettes are little nuggets of gooey, richly flavored melty cheese, painstakingly coated in an audibly crispy, golden-brown crust. If you were to imagine the culinary world, it is as if the most luxurious artisanal grilled cheese and the ultimate late-night mozzarella stick had a very sophisticated love child.
Unlike traditional mozzarella sticks, which are often just hunks of string cheese wrapped in basic breading, true European-style cheese croquettes start with a remarkably thick béchamel sauce. You create a robust, savory roux made of butter and flour, enrich it with whole milk and egg yolks, and melt staggering amounts of cheese into it until it resembles a thick, stretchy dough.
This magnificent mixture is then chilled until firm, formed into delicate little bite-sized balls, meticulously breaded through a classic three-step dredging station, and finally deep-fried to a shimmering golden brown. The contrast between the fragile, shattered crunch of the breadcrumb exterior and the molten, lava-like flow of the seasoned cheese interior is what makes this dish legendary. They are versatile, portable, bite-sized, and absolutely mesmerizing.
5 pro Tips for Making this recipe
Creating the ultimate Crispy Cheese Croquettes is not inherently difficult, but it requires a bit of patience and attention to culinary technique. To ensure you don't end up with exploded cheese balls or a soggy exterior, follow these five essential professional tips:
1. The Chill Time is Absolutely Non-Negotiable
You must chill the cheese base for a minimum of 6 hours, and ideally overnight. When you finish cooking the cheese filling, it will be soft, sticky, and completely impossible to roll. Chilling solidifies the butterfat in the roux and tightens the cheese, allowing you to easily roll them into perfect, uniform spheres. If you rush this process and attempt to roll or fry the mixture while it is still room temperature, the croquettes will melt into pancakes in your hot oil, causing the cheese to leak entirely out of the breading.
2. Perfect Your Roux Technique
The base of these croquettes relies entirely on cooking a proper butter and flour roux. You must cook the flour long enough to remove the raw, starchy taste. You want to cook the butter and flour mixture over medium heat, stirring constantly. Pay attention to your senses: it should smell nutty and brown before you take it off the heat or add your dairy. This toasted, savory note forms the foundational flavor backbone of the croquette.
3. Maintain Consistent Oil Temperature
Deep frying is all about temperature control. You want your vegetable oil to sit between 350°F and 375°F (175°C – 190°C). If the oil is too cold, the breadcrumbs will greedily absorb the grease, resulting in heavy, oil-logged, and soggy croquettes. If the oil is too hot, the exterior will instantly scorch and burn to a bitter crisp before the interior cheese has time to turn gooey and molten. Invest in a standard clip-on deep-fry thermometer; it is a cheap tool that guarantees success.
4. Use the "Wet Hand, Dry Hand" Breading Method
Setting up your dredging station properly saves you from ending up with heavily breaded, club-like fingers. Use your left hand (the dry hand) to pick up the plain croquette ball, roll it in the flour, and drop it into the egg bowl. Then, use your right hand (the wet hand) to retrieve it from the egg, drop it into the breadcrumbs, and gently coat it. This keeps your liquids and dry ingredients separate and ensures a clean, even, perfectly textured crust on the croquette itself.
5. Never Overcrowd the Frying Pan
When you finally drop your gorgeous, breaded cheese balls into the hot oil, do not succumb to impatience. Fry them in small, manageable batches (about 4 to 5 balls at a time, depending on the size of your pot). Adding too many frozen or chilled items to hot oil at once causes the oil temperature to plummet dramatically. This leads to the aforementioned greasy, soggy croquettes and often causes the delicate crust to stick together and tear apart, letting all your precious cheese bleed out into the oil.

Ingredients Needed

Creating a masterpiece of comfort food requires understanding the role each ingredient plays. You will need the following simple, readily available components to construct these incredible crispy bites.
The Cheese Filling:
- Unsalted Butter (3 Tablespoons): The fat source for your roux. Use unsalted butter strictly. The cheeses themselves carry quite a bit of inherent sodium, and using salted butter removes your ability to control the seasoning. If your mixture turns out overly salty, it completely ruins the rich, delicate dairy flavors.
- All-Purpose Flour (1/2 Cup): This acts as the thickener for your cheese base. It combines with the butter to create the roux, turning your milk and cheese into a firm, workable dough-like consistency rather than a runny soup.
- Whole Milk (2/3 Cup): For the richest, creamiest texture, use whole milk. You want the fat content here. Skim or 2% milk contains too much water and can lead to ice crystals forming during the chilling phase, which translates to spitting oil when frying.
- Egg Yolks (2 Large): These serve as a powerful emulsifier and a thickening agent, giving the interior cheese sauce an incredibly velvety, luxurious mouthfeel akin to a savory custard. Save the egg whites for a healthy morning scramble!
- Grated Cheese (1 1/2 Cups): While we usually rely heavily on shredded mozzarella cheese for its legendary, Instagram-worthy cheese pulls, this is where you can get creative. Swiss, gruyere, sharp white cheddar, or a blend of all three are magnificent options. Make sure to grate the cheese yourself from a solid block; pre-packaged shredded cheeses are coated in anti-caking starches (like cellulose) that prevent them from melting smoothly.
- Kosher Salt (1/2 Teaspoon): A pinch of quality salt enhances the savory notes of the butter and cheese.
The Breading and Frying Station:
- All-Purpose Flour (1/3 Cup): The first layer of the dredge. Flour provides a dry, textured surface for the egg wash to cling to.
- Egg (1 Large, Beaten): The glue that holds your crispy crust together.
- Milk (1/4 Cup): Thins out the beaten egg just enough to create an even, light coating that isn't too thick or eggy.
- Fine Breadcrumbs (1 Cup): While standard Panko breadcrumbs give an ultra-crunchy, jagged exterior, we highly prefer plain fine breadcrumbs for this specific recipe. Fine breadcrumbs create a tight, seamless, and beautifully neat golden shell that effectively seals the cheese inside, preventing blowouts during frying.
- Vegetable Oil (For Frying): You need a neutral, high-smoke-point oil. Canola oil, peanut oil, or standard vegetable oil work perfectly. Do not use extra-virgin olive oil, as it will smoke out your kitchen and impart a bitter, burnt taste to the food.
- Flaky Sea Salt (For Garnish): A generous sprinkle of flaky Maldon sea salt the absolute second these come out of the hot oil makes the crust pop with flavor and adds an extra layer of gourmet texture.
Step-by-Step Instructions
Follow these instructions methodically, and you will be rewarded with a towering plate of unparalleled crispy, cheesy joy.
Step 1: Cook the Béchamel Base
In a heavy-bottomed medium saucepan, melt your 3 tablespoons of unsalted butter over medium heat. Do not let it aggressively sizzle or brown just yet. The moment the butter is completely melted, vigorously stir in the 1/2 cup of all-purpose flour. Use a wooden spoon or a silicone whisk. Keep stirring constantly to cook out the raw flour taste. The mixture will quickly become crumbly, clumpy, and thick—this is completely normal! Let it cook for about two minutes. Remember, it should smell nutty and brown before you take it off the heat or proceed.
Step 2: Incorporate the Dairy and Cheese
Once your roux is golden and toasty, slowly stream in your 2/3 cup of milk while whisking aggressively. The mixture will seize up initially and then quickly smooth out into a very thick paste. Immediately drop your heat down to low. Stir in your 2 egg yolks, seamlessly followed by your 1 1/2 cups of freshly grated cheese and 1/2 teaspoon of salt. Switch back to a wooden spoon and stir constantly, scraping the bottom of the pan to prevent scorching. Cook just until the cheese is entirely melted and smoothly incorporated into the batter. The mixture will be very thick, pulling away from the sides of the pan slightly.
Step 3: The Crucial Chilling Phase
Using a silicone spatula, scrape the hot, molten cheese dough out of the saucepan and into a wide, shallow glass dish or bowl. Spread it out into an even layer—this increases the surface area and helps it cool faster. Press a sheet of plastic wrap directly against the surface of the cheese mixture to prevent a tough skin from forming on top. Place the dish securely in the refrigerator and leave it completely undisturbed. Chill it for a minimum of 6 hours, or ideally overnight. Do not skip this step!
Step 4: Shape the Croquettes
Once your cheese mixture is wonderfully cold and exceptionally firm to the touch, it is time to shape. Wash your hands well. Scoop out about 1 to 1 1/2 tablespoons of the chilled mixture at a time. Roll the mixture between the palms of your hands to form a tight, compact, uniform little ball. If the mixture feels a bit sticky, you can lightly mist your hands with a tiny bit of non-stick cooking spray. You should yield approximately 12 perfectly uniform balls. Set them all on a parchment-lined baking sheet or plate.
Step 5: Prepare the Breading Station
Take out three shallow, wide-rimmed bowls (cereal bowls work great).
- Bowl 1: Add the 1/3 cup of all-purpose flour.
- Bowl 2: Briskly whisk together the 1 whole egg and the 1/4 cup of milk until completely homogenous and pale yellow.
- Bowl 3: Pour in your 1 cup of fine breadcrumbs.
Roll a chilled cheese ball thoroughly in the flour, tapping off any excess. Next, submerge it entirely into the egg mixture, ensuring no dry flour spots remain (dry spots will cause the breadcrumbs to fall off). Finally, roll it through the fine breadcrumbs, pressing gently so the crumbs adhere securely to the entire surface, forming a complete seal. Repeat for all 12 balls.
Step 6: Deep Fry to Golden Perfection
In a heavy-bottomed Dutch oven, a deep cast-iron skillet, or a heavy pot, pour in approximately 3 to 4 inches of vegetable oil. Affix your deep-fry thermometer to the side of the pot and heat the oil over medium-high heat until it registers exactly 350°F to 375°F.
Carefully lower the breaded croquettes into the hot oil using a metal slotted spoon or a spider strainer. Work in batches of 4 or 5 at a time so you do not overcrowd the pan. Fry them, gently rolling them around in the oil occasionally, until they boast a gorgeous, deep golden-brown crust. This will take exactly 2 to 3 minutes.
Remove the fried croquettes from the hot oil and place them immediately on a wire cooling rack set over a baking sheet, or a plate generously lined with paper towels to drain the excess grease. While they are still glistening and piping hot, hit them with a generous pinch of flaky sea salt. Serve them immediately while warm, crispy, and oozing!
Reheating Tips
Because of the high moisture content of the cheese and the fat in the frying oil, these croquettes have a habit of getting soft in the refrigerator. However, reviving that legendary crunch is incredibly easy if you follow the right methods.
The Absolute Rule: Never, under any circumstances, microwave a leftover cheese croquette. A microwave heats the water molecules rapidly from the inside out. The cheese will instantly boil, erupting through the crust, while the breadcrumbs will turn to a sad, rubbery, wet sponge.
Oven Method (Highly Recommended): Preheat your conventional oven to 400°F (200°C). Place the leftover croquettes on a baking sheet lined with parchment paper or a silicone baking mat. Bake them for exactly 6 to 8 minutes, gently rolling them or flipping them halfway through the cooking time. The dry heat of the oven crisps the oily exterior back up beautifully while slowly bringing the cheesy center back to a molten state.
Air Fryer Method: For a faster revival, you can throw cold leftover croquettes into the basket of an air fryer. Set the air fryer to 380°F and heat for 4 to 5 minutes. Watch them closely so they don't burst!
Storage Tips
If you manage to not eat the entire batch in one sitting, proper storage will ensure your leftovers remain safe and tasty for days to come.
- Cooling Down: Before you pack them away, allow the fried croquettes to come down to room temperature entirely on a wire rack. Putting hot food into a sealed container creates heavy condensation, which rains down onto the breading and turns it instantly to mush.
- Refrigerating: Once completely cooled, place the croquettes into a rigid, airtight food storage container. Try to keep them in a single layer. If you must stack them, separate the layers with a sheet of wax paper or parchment paper so they do not stick together. Store in the refrigerator for up to 3 days.
- Make-Ahead Pre-Frying (Chilling): If you want to prep these for a dinner party, you can complete the recipe up to the breading step. Store the fully breaded, uncooked balls in the fridge on a baking sheet wrapped in plastic for up to 24 hours before you are ready to fry them.
How to Make a Big Batch
Because these croquettes are insanely popular at gatherings, dinner recipes, and holiday parties, you will almost certainly want to scale this recipe up. Making a big batch requires a touch of organization but is highly rewarding.
To double or triple this recipe, the math scales perfectly. Simply double every single ingredient (e.g., use 1 whole cup of flour for the roux, 3 cups of cheese, etc.).
Big Batch Production Tips:
- Use a larger pot for the filling: When tripling the roux, make sure you use a wide, heavy-bottomed Dutch oven. You need enough surface area to constantly stir the flour without spilling.
- Assembly Line Breading: Enlist a family member! Set up a long assembly line on your kitchen counter. Have one person be the designated flour-and-egg station operator, and the second person be the breadcrumb-and-tray operator. It cuts the prep time in half.
- Hold Them Warm: If you are frying 50 of these for a Super Bowl party, you want to serve them all at once. Preheat your oven to a low 200°F. Place a wire rack inside a baking sheet. As each batch comes out of the hot oil, drain them briefly, salt them, and place them on the wire rack in the warm oven. The gentle heat will keep the cheese molten and the exterior crackling hot while you finish frying the rest of the mountain.
How to Add More Ingredients
The beauty of a thick, savory cheese béchamel is that it acts as a magnificent blank canvas for an infinite variety of flavors and inclusions. If you want to transform these from a simple snack into hearty, complex easy meals, here are some incredible ways to add more ingredients into the filling before chilling:
Incorporate Cheesy Potatoes
If you love traditional Spanish potato croquettes but also desperately want the stretch of our cheese croquettes, you can combine the two! Fold 1/2 cup of cold, dry, unseasoned mashed potatoes into the warm cheese mixture just before placing it into the fridge. The starch of the potatoes binds beautifully with the cheese
The Best Crispy Cheese Croquettes (Gooey & Golden)
Ingredients
Cheese Filling
- 3 Tbsp unsalted butter
- 1/2 cup all-purpose flour
- 2/3 cup milk
- 1.5 cups mozzarella cheese grated
- 2 egg yolks
- 1/2 tsp salt
Breading & Frying
- 1 egg beaten
- 1/4 cup milk
- 1/3 cup all-purpose flour
- 1 cup fine breadcrumbs or panko
- vegetable oil for frying
- flaky sea salt to taste
Instructions
- Melt the unsalted butter in a medium saucepan over medium heat, then whisk in the flour until completely combined into a crumbly paste.
- Stir the milk, egg yolks, grated mozzarella cheese, and salt into the saucepan. Cook while stirring constantly until the cheese is completely melted and the mixture is smooth.
- Transfer the gooey cheese mixture into a dish or bowl, cover, and chill in the refrigerator for at least 6 hours (or overnight) until firm.
- Scoop and shape the chilled cheese mixture into small croquette balls using your hands, allowing about 1 to 1 1/2 tablespoons per ball to yield approximately 12 croquettes.
- Whisk the remaining egg and milk together in a small bowl. Place the flour and fine breadcrumbs into two separate shallow bowls to form an assembly line for breading.
- Heat approximately 3 to 4 inches of vegetable oil in a heavy-bottomed pan over medium-high heat until ready for frying.
- Dredge each cheese ball first in the flour, dip thoroughly into the egg wash, and finally coat evenly with the breadcrumbs.
- Deep fry the breaded croquettes in small batches for 2 to 3 minutes until perfectly golden brown and crispy. Avoid overcrowding the pan.
- Transfer the fried cheese balls to a paper towel-lined plate to drain excess oil, sprinkle generously with flaky sea salt, and serve warm.
Equipment
- Heavy Saucepan
- Mixing bowls
- Slotted spoon